Wednesday 30 May 2012

Pink Cloud - Better Late Than Never

A while back, the cloud mani was made really popular in the blogosphere by Jane from Nailside. Since then, I've seen these popping up everywhere, even more so on Instagram where some of the girls there created amazing cloud colour combos.

Can you believe this mani was on my list of manis "to try" since November last year and I only just got around to it recently?
I only did a cloud on the accent nail as I wanted a really soft look. Plus, my hand isn't all that steady and I didn't want to mess up on my first try. I got quite a few compliments at work, so I'm definitely attempting the cloud mani again. It's easy and doesn't require long drying time like scotch tape manis do.

The main colour is OPI Pada-monium Pink with Nails Inc Elizabeth Street, OPI Alpine Snow and Primark Bright Pink on the accent nail.


Pin It

Monday 28 May 2012

Exotic Encounters - China Glaze On Safari Collection 2012

When I found out that the store I usually buy my polish from had the new China Glaze On Safari Collection in stock, I immediately placed an order for the two polishes that grabbed my attention the most - Exotic Encounters and I'm Not Lion. Come to think of it now, there are definitely a few more shades I want from this collection and lot of the colours have an autumn/ winter feel to them.

Exotic Encounters is like a dark teal green, definitely leaning more onto green. The formula is very opaque and with careful application, you almost wouldn't need two coats. Although this wasn't a problem at all, I found the consistency quite strange, it started out very thin and runny but by the time I got to my pinky, it became thick and goopy. It reminds me of some Barry M polishes whose formulas are also like this.

I wasn't feeling all that great today and to be honest, was also totally uninspired to do nail art or stamping so I just placed some loose hex glitter whilst the polish was still wet, to form french tips.


I have a bad feeling that this polish stains because when it pooled onto my cuticle on one of my nails, it was a pain to remove! I hope that isn't the case as I've only just recently got rid of some other staining!


Thanks for reading and commenting :) Pin It

Saturday 26 May 2012

Pastel Tie-dye Accent

Today I finally tried something I've been meaning to do for ages. My "to do" list just keeps getting bigger :)

Needle drag or needle marble manis as they are most often called, quite simply involve dragging a needle through still wet and goopy polish to create the blend of colours and the tie-dye effect. There are a few You Tube tutorials on this and I particularly like THIS one by Liquid Jelly, the pattern she created looks so amazing.

I generally like the way these look, they are easy to do and lets be honest, I completely suck at water marble manis so this is the closest I can get to it!


What do you guys think of needle marble manis? Pin It

Thursday 24 May 2012

Surfin' For Boys - China Glaze Summer Neons 2012

I received two polishes from China Glaze's Neons Collection 2012 in the post a couple of days ago - Surfin' For Boys and Love's a Beach. We've had such great weather for a last few days that I couldn't wait to try these out.

As soon as I slapped this on, it was like "Whoa!!!". In the bottle, Surfin' For Boys looks like a coral with hints of red and orange, with ultra fine magenta shimmer. On my nails however, it's the brightest most neon orange I have ever seen! This is probably because I'm wearing "undies" as I don't like to wear neons on their own.

Let me tell you! It was a PITA trying to photograph this polish! All pictures showed a different colour and none of them true to real life colour. The closest to real life colour is the first picture which I had to change the setting of my camera for and darken the whole image to be able to capture! I think neons look better in the dark anyway, that's why they always look awesome with a tan!

I don't have anything else this bright, looking at it too long even hurts my eyes and I'm sure people will be able to see 10 little dots coming a mile away! This baby is going on my toes tonight for sure :)


If I tried to take a pic under my usual craft lamp, my camera would completely spaz out:

Here is a pic in the shade:

And in direct sunlight:

Pin It

My Guest Post Over At Northern Nails

A few weeks ago, Jo from Northern Nails was so sweet to ask me if I could guest post for her whilst she is on holiday. It's my first guest post and you can see it HERE. Thanks for having me Jo :)


Polishes used: Beauty UK Urban Jungle. Stamped with BM21 and Barry M Gold Foil and added striping tape!

Pin It

Tuesday 22 May 2012

Nude & Peachy Gradient

Since my last "cotton candy" looking gradient, I've been trying to get that gradation of colours to smoothly blend together, just like in Sammy's tutorial. I thought that the easiest way to achieve this would be to use soft and light colours since I have such a hard time blending very contrasting colours.

So for this mani I opted for Elf Desert Haze and Collection 2000 Fruit Loop. However, after I had finished, I realised these colours are way too close to each other to get a massive contrast, but I think I got a hang of the "blending" bit without that noticeable line of where the two colours meet. Next step is trying to do this with more contrasting colours!

Apologies for the picture quality. These two colours were really hard to capture under a lamp. Even my iPhone pictures turned out better than my camera pictures.


Pin It

Sunday 20 May 2012

Chromatic Pastels

Back in November, I posted this mani called "Chromatic Neon Dots". A metallic foil base topped with colourful neon dots. Since then, I've received a lot of positive feedback on my IG feed for this mani so I decided to recreate it but this time with softer pastel dots.

I still prefer the way the neon dots look against the silver, they are obviously much brighter and stand out more but it's toned down cousin isn't so bad either.

I used Stargazer Chrome Silver #232 for the base and the dots are a mixture of pastel coloured polishes ranging from Jessica Samba Parade to Barry M Lemon Ice Cream, to Rimmel London Misty Jade.


(Haha, the reflection on the bottle...me in my house sweater! Lol!)

Thanks for reading and commenting :) Pin It

Saturday 19 May 2012

Elvis' Pink Cadillac

I think it's really cool that for the past few months indie polishes have been a huge trend! In my opinion, they bring something to the table that commercial brands were lacking! There is definitely a gap in the market for indie polishes and their unique looks.

Pretty & Polished Elvis' Pink Cadillac and Midnight Masquerade are the only two I currently own, as far as I'm aware we don't have any good indie polishes over on this side of the Atlantic and getting them shipped from the States can be very costly. I bought these directly from Chelsea's Etsy store.

I posted pictures of EPC on my Instagram feed a couple of months ago but then forgot to post them on my blog too until I was going through the picture folders on my laptop and saw that they were still in my "to post" folder!

 So here you have it. This is 2 coats of EPC over a thin coat of Jessica Samba Parade as the formula in EPC is a little on the sheer side and I like full opacity. Needless to say, I'm really happy with this polish! I just can't get enough of the black glitter and hex pieces swirling in the marshmallow pink shade.


And here is a bottle shot of Elvis' Pink Cadillac and Midnight Masquerade. I love that fuchsia and green glitter suspended in black jelly!

Pin It

Thursday 17 May 2012

Silver Glitter French Mani & Born Pretty M71 Plate Review

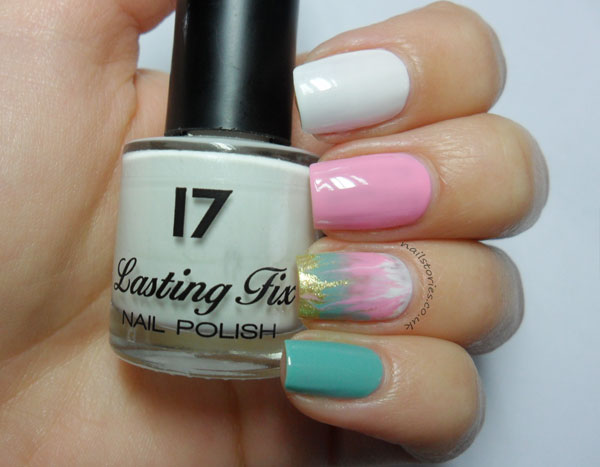
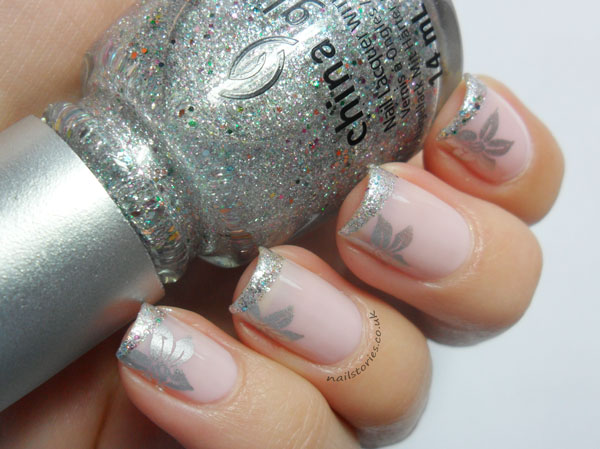
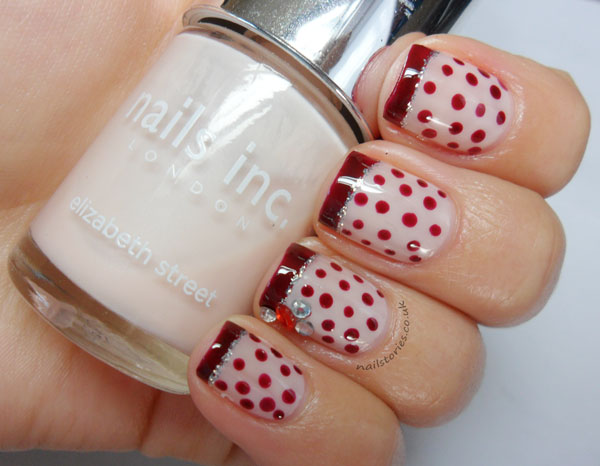
Today I have a review for you. The lovely ladies from the Born Pretty store offered me the chance to review their M71 stamping plate, which is most popular for the Hello Kitty image. However, for this reason I wanted to give one of the other images a go first and decided on one of the flowers and a simple french.

I used Kiko 209 for the nude pink'ish base, China Glaze Polarized for the slanted french tips and Barry M Silver Foil to stamp with.


Other than the plate, they sent me a stamper and scraper as well which can all be bought HERE for $3.49 (free shipping). The M71 plate has 9 small images consisting of various flowers/ plants, fruit, cat, dolphin, butterflies and the famous Hello Kitty.

As you can see in the picture below, the stamper is shorter than my Konad one but the diameter is only the slightest bit smaller, which shouldn't cause any issues when stamping.
The silicone bit is somewhat firmer than Konad which meant I had to apply a lot more pressure on it. I used it on a couple of nails but had to switch back to my Konad stamper because of this. I had no problems at all picking up the image, the firmness of the silicone just made it difficult to transfer onto the nail.

The scraper is also slightly smaller than the Konad one but the blades are the same. They both do damage to the plate which is the reason I often use a old credit card. 

Born Pretty plates in general, are a very good alternative to Konad as they are of good quality and at a fraction of the price.The store has an array of different plates to chose from and a whole lot of other nail art equipment and decorations. You can get 7% off if you use the discount code on my sidebar - VA7J61.

Pin It

Tuesday 15 May 2012

Can I Call This A Gradient?

Gradients are everywhere at the moment! I can't open my blog feed, my IG or my Pinterest without stumbling upon a gradient or ombre as it's often called, and I'm loving it! I've always loved gradients so I'm really glad they're everywhere!

In the past couple of weeks, I've seem some of the most beautiful gradients from Jeanette at The-swatchaholic,  from Carolina at Colores de Carol and of course Sammy's brilliant tutorial.

I had to try a gradient myself but it didn't quite turn out how I had planed! I was hoping for that smooth transition from one colour to the next, like that blended eyeshadow effect as I like to call it, without any of the grittiness but I had no such luck :( Maybe I should have used more complementing colours instead of contrasting.

I still like the way it turned out but I wasn't trying to go for the obviously clear graduation look. It's definitely something I'll try again soon, after I practice a little more.


I added a layer of Accessorize Crystal Shimmer to add a little bit of sparkle and at a last attempt of smoothing everything out.


Pin It

Monday 14 May 2012

Dragon & The Shield

This polish needs no introduction. Dragon from A England's The Legends collection is a stunning scattered holo masterpiece. If you love greens, you need to go and get yourself this polish! If you have tried A England polishes before, you'll know that they apply like butter and are mostly one coaters. The holo effect of this green is subtly packed with tones of gold! I love it!

I added a "shield" to the accent finger using Barry M Gold Foil. I would usually call this a "checkered mani" but it does remind me of a medieval shield and it fits the theme of the polish, so let's go with shield :)


I love all types of holo polishes, I know I'm not the only one! But the biggest pet peeve of mine is when I so badly want to wear a holo and there isn't a single ray of sunlight! However, I also took a picture of this polish indoors and I was surprised that some of the subtle holo effect was still there! It's amazing how it doesn't look completely flat like a lot of other holos.


Pin It

Saturday 12 May 2012

Nude on Nude

Today's mani was inspired by one of my IG friends, Nicole. If you have an IG account, check out her amazing manicures, she is super talented and her nails are gorgeous (@nic_tchelly). Nicole also sent me a bunch of amazing goodies from Hawaii which I can't wait to share with you, Color Club Love'Em/ Leave'Em being one of them.

Love'Em/Leave'Em is such an unexpected holo because it's a nude! I don't have any other nude holo in my stash so this is a perfect addition! The holo effect is subtle which adds to how delicate and classy the polish looks. The pictures below are only one coat so I think this polish has very good coverage. It also applied like butter, no aqua base coat needed!

I took the "nude" theme all the way through to the mani as well and decided on a nude half moon mani with copper coloured loose pieces of hex glitter which I stuck along the half moon line.


Thanks for reading and commenting! Pin It

Thursday 10 May 2012

Hits Speciallita - Moonbow from Phenomena Collection

Today I have a very special polish to show you - Moonbow from Hits Speciallita Phenomena collection.

Bia from Nails by Bia sent me the loveliest package in the mail which included Moonbow and Afterglow from the Phenomena collection, some amazing holo and chrome glitters, Cutie Pie from the Mari Moon collection and a couple of flakies from the Mundo De Dancas collection. Can't wait to share all of these with you, thank you so much Bia!

Hits have done it again! I can't get enough of these polishes! Moonbow is the most multichrome of the collection. Depending on the light, it shifts green, gold, purple, blue and magenta. I had a really hard time trying to capture all the colours as it's been very cloudy here recently and the lighting has been constantly terrible, thus the awkward hand positions!

This is 1 coat of Moonbow over black. Two coats would obviously give a stronger effect but the bottle is so little so I don't want it to finish too quickly! The glitter is coarse which I love so it does require a thick top coat.


Here's a bottle shot of Moonbow and Afterglow. Don't they just look yummy?

Pin It

Wednesday 9 May 2012

Retro Dots

Time for some polka dots! I just love everything about polka dot manis. They always look great and are extremely quick and simple to do with no major drying time between layers.

This is the last mani I did before I went on holiday, thus the reason my nails were still short. I haven't filed them right down in a while so they are quite long at the moment. I guess I'm giving the long nail look another go, until I break one, scratch myself or do something idiotic like that.

I went a bit crazy with the dots for this mani. I just started layering smaller dots over larger dots and when I finished, maybe because of the colours I used, it looked quite retro to me. I used Barry M Blueberry Ice Cream as my base colour and for the dots I used Color Club Best Dressed List and OPI Alpine Snow.


Here is what Barry M Blueberry Ice Cream looks like on it's own! It's such a gorgeous blue. In fact, I really like all the colours in the Barry M Ice Cream collection.


Pin It

Monday 7 May 2012

Papa-paparazzi

A while ago I was looking at "Lady Gaga nails" on You Tube and came across some really cool designs! There were quite a few clips on how to do nails like her Paparazzi outfit which I found really cute so I thought I'd give them a go!

I used Beauty UK Yellow Peril as a base colour and a dotting tool to draw the Mickey Mouse heads. The very thin gold french tips are made of striping tape.


Pin It

Saturday 5 May 2012

Enchanted Forest Glitter Sandwich

I hope everyone is having a great Bank Holiday weekend! This afternoon I have a bright green glitter and jelly sandwich to show you which I did a couple of weeks ago when my nails were still short!

I used Risque Verde Esmeralda, a vibrant green jelly from Brazil as my jelly base! Risque polishes don't get as much attention as Speciallita ones, at least not over here, but they have some amazing collections and colours.
Sandwiched between this jelly goodness is one coat of NYX Enchanted Forest - large, medium and small pieces of hex holo gold and green glitter.


Pin It

Thursday 3 May 2012

60's Red Polka Dot French

A nude and cherry red polka dot French. That's what I wanted to show you guys today! I thought it was very retro and 60's looking, hence the post title :)

Since I've been back, I've been so busy that my nails have been naked for a few days! I managed to finally paint my nails last night with a Speciallita polish I recently received in a swap and I will post that as soon as I've posted these last few manis I did before I went on holiday!


For this mani I used Nails Inc Elizabeth Street, a creamy nude shade with the slightest hint of rose. I use this polish very often as a base for funky Frenches! The tips and polka dots are Nails Inc Victoria, a dark cherry red which is much darker than what you can see in these pictures but as I just applied one coat over the tips, it looks lighter.


Thanks for reading and commenting :) Pin It
Related Posts Plugin for WordPress, Blogger...